Spring Boot Transformations
19th of July 2018Technical debt is a real issue for most applications that have a somewhat longer lifespan. If their development cycle is slow, and not warranting the overhead of a full-fledged micro services approach, the need of occasional adaptations can steadily increase over the years. In light of the advances made in the Spring ecosystem, and the possibilities it opens up, the business owner of the Wonderland Designs web shop decided to invest in an upgrade of the Spring MVC 3.0 application to the newest member of the Spring family: Spring Boot 2.

The Basics
Introducing Spring Boot 2 instead of the standard Spring Web MVC from before at the beginning involves transforming the various XML configuration files still containing some configuration values into a single file “application.properties” which is situated in the “src/main/resources” folder of your project. Here you can set parameters needed for the bootstrapping of your application. When removing the need for an application server, the first concern is your application context, as it determines the prefix for the URLs used throughout your application. This is done by adding the correct property to this file. However, since there can no longer be multiple components running on the same port for Spring Boot, the use of a context path becomes less relevant, and should just be abandoned altogether. Some of the more common configuration elements are:
| Key | Value |
|---|---|
| server.servlet.context-path | The servlet context for the application |
| spring.datasource.url | The URL for your datasource |
| spring.datasource.username | The user name for your datasource |
| spring.datasource.password | The password for your datasource |
You can overload these values by creating additional application property files, naming them for the environment in which they are used: “application-
$ java -jar -Dspring.profiles.active=dev app.jar
Little tidbit to know: When running your application in debug mode, it will automatically enter a break when it encounters an exception. Unfortunately, when booting up, Spring Boot applications automatically generate a SilentExitException, which the spring-boot-devtools module uses to kill the main thread for replacing it with a reloadable version. Ignore this exception as it has no bearing on your application functionalities, and just click continue in your debugger. If you don’t like this behavior, you can always set your debugger to not stop at exceptions. Or you can disable the devtools restart functionality altogether by setting the appropriate system property:
System.setProperty("spring.devtools.restart.enabled", "false");
Spring Security
With Spring Boot introducing an upgraded version of the Spring Security libraries, we switch from an XML-based configuration to a functional programming of the security. In order to activate Spring Security, it is sufficient to place it on the classpath, and Spring Boot will detect it, and activate the security layer. This can easily be done by adding the dependency in our pom.xml.
 <dependency>
	<groupId>org.springframework.boot</groupId>
	<artifactId>spring-boot-starter-security</artifactId>
 </dependency>
Placing the xml configuration next to the coded configuration, we can see that they show a lot of similarities in order to make the transition as intuitive as possible. The example below will secure the config URL pattern for the administrator. This code needs to be placed in a class which extends the WebSecurityConfigurerAdapter, and which is annotated with @Configuration. In order to add additional configuration, there are several other methods that can be overridden from the WebSecurityConfigurerAdapter abstract class.
| Spring MVC 3 | Spring Boot 2 |
|---|---|
<http auto-config="true">
    <intercept-url pattern="/config/**" access="ROLE_ADMIN">
</http>
|
 @Override
 protected void configure(HttpSecurity http) throws Exception {
    http
        .authorizeRequests()
        .antMatchers("/config/**").authenticated()
        .anyRequest().permitAll()
        .and()
        .httpBasic()
        .and().logout()
        .logoutUrl("/logout")
        .invalidateHttpSession(true);
} |
Thymeleaf versus JSP
One of the more work intensive changes was the switch from Java Server Pages to Thymeleaf templates. In order for Thymelead to become active, it just needs to be placed on the classpath, and Spring will automatically start using it. Thymelead by default looks for its pages in the “src/main/resources/templates” folder and looks for its static content (css, js, images, …) in the “src/main/resources/static” folder. Moving away from taglibs and using attributes on the proper HTML elements made for a lot of rework. Some of the more common conversions to be made were the following:
| Taglib Scriptlet | Thymeleaf Equivalent |
|---|---|
| <c:url value="URL"/> | th:attr=”@{URL}” Example: <a th:href=”@{/next.html}”>Next</a> |
| <spring:message code="shopitem.soon" /> | th:attr=”#{shopitem.soon}” Example: <i th:utext="#{ shopitem.soon } + ': '"></i> |
| <c:out value="${item.title}" /> | th:attr=”${item.title}” Example: <h1 style="padding: 20px 0" th:text="${item.title}"></h1> |
| <c:forEach var="topic" items=" collection" varStatus="iterStat"> | <th:block th:each="topic,iterStat : ${collection}"> |
| <form:form modelAttribute="account"> | <form th:object="${ account}" method="post"> |
| <form:input path="lastName"> | <input name="lastName" th:value=”${lastName}”> |
| <form:errors path="FieldName" /> | <div th:if="${#fields.hasErrors('*{FieldName}')}" th:errors="*{ FieldName }" ></div> |
Introducing the JPARepository with Spring Data
Spring Data introduced the concept of a JpaRepository since the last iteration of the web shop. The concept is easy: To create a repository, you need to write an interface which extends the public interface
JpaRepository
@Repository
public interface ShopItemRepository extends JpaRepository
This tells Spring to autogenerate an implementation which respects the JpaRepository interface. Out of the box, this offers a number of common methods, such as flush or delete. These methods all have names that
are self-explanatory, and you can see them all on the class diagram below. We can add additional query methods to our proper interface that also get generated into the implementation bean by Spring. These query
methods follow the convention structure shown in the class diagram, and the
@Repository
public interface ShopItemRepository extends JpaRepository
Next, we create an implementation class for this custom interface which we annotate with @Repository as well as the primary interface. Spring will realise what needs to be done and will wire its beans in such a fashion that when we access a JpaRepository method, it will use its generated class, and when we access a ShopItemCustomRepository method, it will use the implementation class we provided. The inside of the implementation class will look the same as the repositories we wrote for Spring in the past, normally with the EntityManager wired into the class, so we can perform the necessary persistence and query actions.
 @PersistenceContext
 protected EntityManager entityManager;
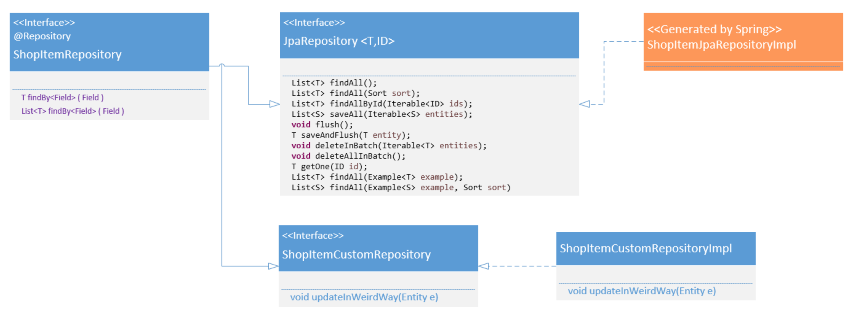
Class Diagram for Repository Interfaces and Implentations
Configuring the Logging
Logging in Spring Boot is a bit the odd one out. Where all other xml configurations have been banished and replaced with functional programming equivalents, the setup for your logging still happens with plain old XML. Spring Boot will scan the classpath when launching for any of these files. When found, it interprets their content, and overrides its default configuration for logging. The xml content is still similar if not identical to the old log4j and logback configuration files. The naming conventions for these files are:
- logback-spring.xml
- logback.xml
- logback-spring.groovy
- logback.groovy

Click for Larger Picture
Another weird phenomenon might occur when you launch your app in Eclipse (this doesn’t happen in IntelliJ, and I haven’t verified in other used IDE). The console might show weird characters that are spread across you log lines as shown in the screenshot above. These are ANSI escape sequences for coloring the logs, for which Eclipse doesn’t have a standard way of depicting. If you want to correct this, a plugin for Eclipse exists that allows it to properly show these characters. This plugin is called the ANSI Escape in Console plugin and you can find the plugin here. This plugin will let Eclipse show the logs in console like the screenshot below.

Click for Larger Picture
| Thought | Silo Architecture | Security |