Secure with Social
6th of June 2018It is no longer an isolated case when an application on the web or a mobile app asks you to identify yourself using your social media login credentials, most common of which are your Google account or Facebook profile. It simplifies the life of the user, as he or she doesn’t need to memorize another username/password pair, and it provides the application with more detailed demographic information on the users of their provided functionalities. This login is usually based on either the Security Assertion Markup Language (SAML) or the OAuth protocol, where authentication (and sometimes even authorization) is federated to the chosen Social Identity Provider (IDP). Where I have used the SAML protocol in the past, the OAuth protocol, although very similar to how SAML works, needs some further study to familiarize myself with it.

A mere three years after the first ratification of the SAML protocol, OAuth enters the battlefield of security protocols. It was the brainchild of Blaine Cook, who was working on the Twitter OpenID implementation at the time, and several others who expressed a need to delegate authentication of their applications to this solution. The Ma.gnolia services were among the first to need this kind of functionality in order to be exposed to their users’ dashboards. After this realization, a discussion group for this topic was founded, which later transformed into a Birds of a Feather Group during the 73rd Internet Engineering Task Force (IETF) Meetup. The result: A first official version of the protocol for widespread adoption outside of the Twitter influence sphere saw the light in April 2010. This was afterwards followed with a draft for OAuth 2 in October 2012.
I will be looking exclusively at OAuth 2.0 in this thought, as it is the most recent in the timeline. Beware that OAuth 2.0 is not backwards compatible to the first version of the protocol. Before we can dive into the specifics of the exchanges between the different involved parties, there are four roles in this mechanism that are important:
- The Client: This is the third-party application wanting access to the user information. For this it needs the approval of the user that owns this information.
- The Resource Server: This is the server that can provide the Client with the needed user information. Together with the Authorization Server, it constitutes the IDP.
- The Authorization Server: This is the server that presents the interface where the user can approve or deny access to his information.
- The Resource Owner: The person granting access to his account (user information).
Before the actual exchange between the client and the IDP can occur, a manual administration step needs to happen to set up the possibility of this exchange. The administrator of the Client needs to register the application with the resource server. This will generate two unique keys: the Client ID (public identification of the client application) and the Client Secret (private identification of the client application). The principle is to provide the client id with the service call to the Authorization Server and keep the client secret confidential. When translating this to the client application, the client secret should only be known on the backend server of the application. A final piece of information to record in this step is the Redirect URL. This is the endpoint the Authorization Server will send its Authorization Code.
The exchange between the client and the IDP starts with the client application sending a request over HTTPS to the Authorization Server. This request contains 5 pieces of information that are used by the Authorization Server:
- The Response Type indicates which type of authorization the Authorization Server should send back. The standard value for this is “code”. If the value is “code”, this launches a Basic flow, requiring a POST to the token endpoint to obtain the tokens. If the value is “token id_token” or “id_token token”, it launches an Implicit flow, requiring the use of Javascript at the redirect URI to retrieve tokens from the URI #fragment.
- The Client ID is the public identification of the client application that we generated in the administration step.
- The Redirect URL is the endpoint that the Authorization Server needs to send its payload to once the user trying to log in has confirmed access and authorization. This has been registered in the administration step.
- The Scope indicates which type of user information the client application wishes to access on the resource server.
- The State is a value passed along to the Authorization Server as part of a handshake. The client application will expect this value to be passed back to it.

Additionally, id the Authorization Server supports Proof Key for Code Exchange (PKCE) functionality, this request can also incorporate a Code Challenge value and a Code Challenge Method (this is usually sha256). The Code Challenge is the hashed value of a chosen plain text that will be verified as part of step 4.
The next step happens in the interface that is provided by the Authorization Server to the user of our application, where said user can confirm or deny access to his user information, determined by the Scope of the request.
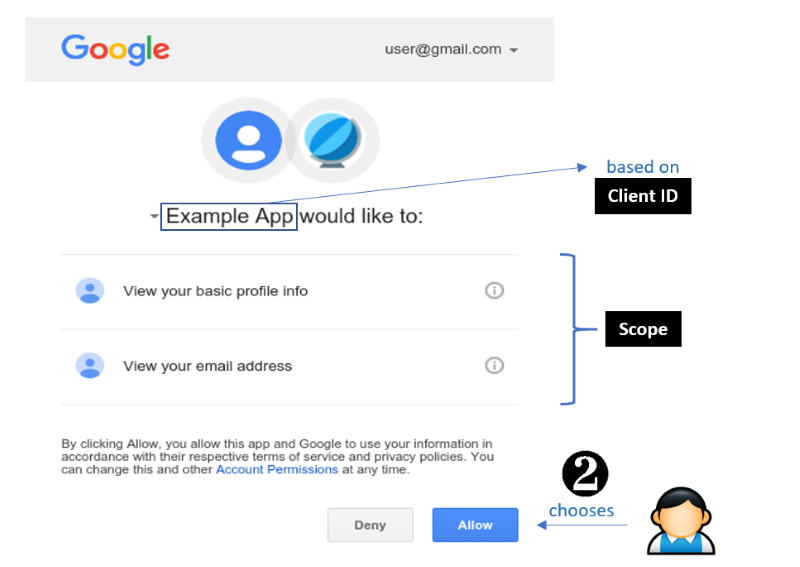
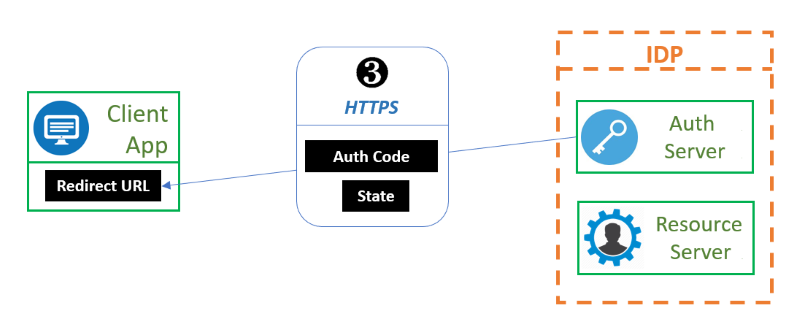
When the user clicks on the Allow button, a HTTPS redirect is done towards the Redirect URL from step 1, with as additional information the Authorization Code from the Authorization Server as well as the state value provided in the request from step 1. This is primarily to verify whether the redirect endpoint isn’t being duped into accepting arbitrary authorization codes from for example a “Man in the Middle”-attack.
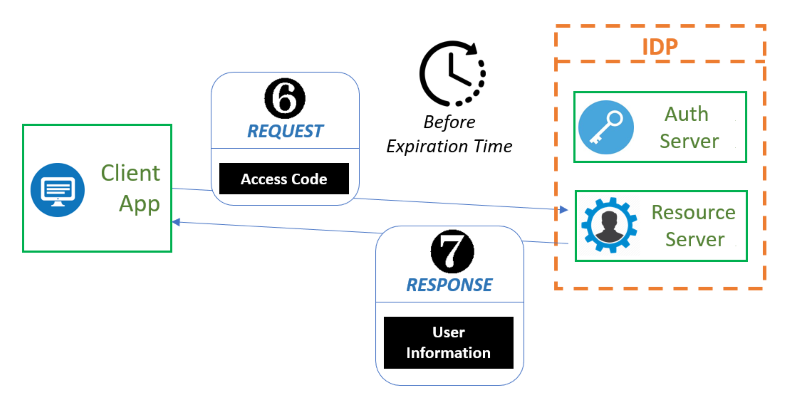
The Client application now needs to use the Authorization Token to obtain an Access Token. It does this by sending to the Authorization Server an HTTPS POST with the Authorization Token in combination with the Client ID and the Client Secret from the administration step, the previously provide redirect URL and a Grant Type (which is normally “authorization_code”). More on grant types later in this thought. The response of the Authorization Server (provided all posted data checks out) is an Access Token accompanied by an expiration time when the token will become invalid. If the PKCE functionality is being used (see step 1), then this POST should also include a Code Verifier value, which is the plain text value that was used to create the hashed value sent as Code Challenge.
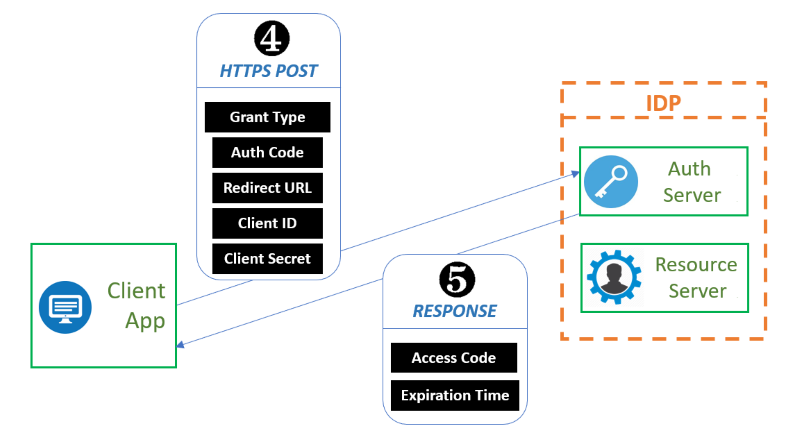
The final step in this exchange is to provide the Access Code to the Resource Server (usually through a specific API exposed as a REST service) within the time that it is valid to receive the information needed for your Client application in response to your request.
Coming back to the grant types, here is a listing of the five most common possibilities for thi parameter, specified in the OAuth 2.0 specification:
- Authorization Code Grant: This is the standard grant type utilized. This type is illustrated by the exchange flow described in this thought.
- Implicit Grant: Utilized primarily in one-page application. This type is used when the Client Secret cannot be kept confidential, so it is not used at all in the exchange flow.
- Resource Owner Credentials Grant: This is used when the Client application and the IDP are in the same circle of trust. The user credentials (username/password) are entered in the client application, and these are passed along to the Authorization Server in step 4 of the exchange flow. Step 1 to 3 are not used in this type of grant.
- Client Credentials Grant: When doing machine to machine authentication, there is no need for user confirmation, so step 1 to 3 are skipped and step 4 only provides this Grant Type, the Client ID, the Client Secret, and the Scope.
- Refresh Token Grant: Since Access Tokens at some point expire (after expiration period), this grant type also delivers a refresh token with the step 5 response that can be used to request a new Access Token to be used in step 6 without having to reiterate the previous steps.
Alex Bilbie provides a nice diagram to decide which type of Grant is needed over at his blog. I have added it here as a reference:
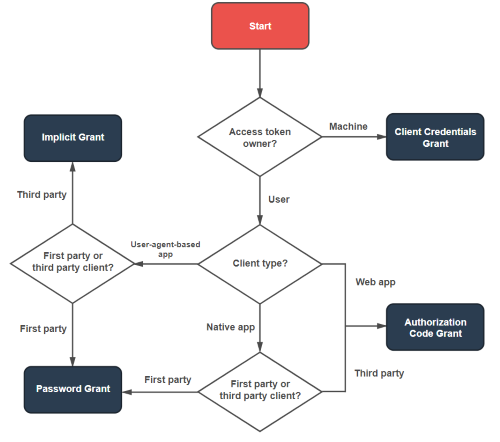
OAuth Grant Type Decision Tree (Alex Bilbie)
One security concern with OAuth 2.0 is that it in its basic form, there is no cryptography being used at a message level. The security of the exchanges hinges completely on the SSL/TLS connection that it is being sent across. With this transport level security being the only level of encryption, this protocol inherits all the weaknesses the SSL/TLS connection might have, such as for example the BEAST vulnerability that popped up with for TLS 1.0 specification back in September 2011. Man-in-the-Middle attacks can be mitigated more effectively by opting to use the PKCE functionality where possible.
| Thought | Security |